

Conclusion first:The installation quality of flexible stone does not depend on how fast the workers are, but on whether seven checkpoints are each passed one by one: substrate, interface, layout lines, adhesive application, bonding, jointing, and curing. If any checkpoint is skipped, problems will appear three months later as hollowing, edge lifting, or joint cracking.
I. Seven checkpoints: why the order must be followed
Thin sheet facing is a "bonding system," and its load-bearing logic is completely different from dry hanging: dry hanging relies on a steel frame to hang the weight on the wall, while bonding relies on the interface to adhere the sheet to the wall. In this chain, each link provides the conditions for the next—if the substrate is uneven, no matter how good the interface is, it is useless; if the interface is not prepared, the adhesive bonds to loose dust; if the chalk lines are inaccurate, all the joints on the entire wall will be crooked.
So the seven checkpoints are not "seven steps", but "seven preconditions". To judge whether a construction team is professional, you do not need to listen to what they say; just see how long they stay at the first checkpoint.

II. First checkpoint: the substrate
The substrate must pass three checks: strength, flatness, moisture content.
Strength.Scratch by hand or with a key; a substrate from which powder can be scraped off is a sanding substrate and must be treated. If the sanding layer is not treated before applying adhesive, the adhesive bonds to loose sand, which is equivalent to no bonding at all.
Flatness.Use a two-meter straightedge plus a feeler gauge to check how far out of tolerance it is. Thin sheets are more sensitive than thick panels—a thick panel can "hide" a one-millimeter undulation within its own thickness, while a thin sheet will replicate that undulation onto the surface as-is, and under side lighting it shows up as waviness.
Moisture content.If the substrate is not fully dry, do not apply. Moisture becomes trapped beneath the adhesive layer; heat expansion will lift the sheets, while soluble salts from the substrate are carried to the surface, causing efflorescence.
What should be done if the substrate is already hollow? The handling sequence is: first define the scope (mark by tapping), then determine the cause (whether the substrate has separated from the structure, or the surface layer has separated from the substrate). Small areas can be repaired by injection grouting; contiguous hollow areas must be removed and redone. Repairing without a clear assessment is equivalent to covering up a problem that will expand.
III. Second Stage: The Interface
The purpose of interface treatment is only one: to make the adhesive truly bond to the substrate. Concrete surfaces are dense with low water absorption, plastered surfaces are loose with high water absorption, and gypsum board has low strength—three types of substrates require three interface methods. This step is often skipped because it "shows no visible effect," but it is precisely what determines the starting point of bond strength.
How to judge the bonding quality of the backing layer? There are three actionable observation points on site:
- Stringing state after applying adhesive: the adhesive can be drawn into continuous fine threads without drying to a skin, indicating a normal state.
- Compaction rebound after adhesion: after compaction, the edges of the sheets do not curl or spring up, indicating that the adhesive is still within its usable time.
- Tapping after curing: a solid sound indicates full adhesion; a hollow sound indicates areas without adhesive.
All three of these are "process judgments," which are more valuable than post-completion acceptance—if hollowing is only discovered at acceptance, the only option is rework.
IV. The third step: chalk-line marking
The chalk lines determine two things: the starting point and the joint positions. If the starting point is chosen wrong, every subsequent panel has to accommodate it; if the joints are not calculated according to panel width, waste will rise noticeably and the joints will look fragmented.
Layout should follow three principles: follow the 1200×2400mm panel module; keep the texture direction consistent, avoiding "one horizontal and one vertical"; and cut irregular pieces from small pieces to use up offcuts. Large walls especially require a layout drawing; do not lay out "from the middle to both sides" on site.
V. The fourth step: adhesive application
Applying adhesive has three hard requirements: full coverage, uniformity, and use within the open time.
Full coat.The four edges must be fully coated; the middle can be combed with a notched trowel, but spot bonding is not allowed. The consequence of spot bonding is that loads are borne separately at individual points, and tapping produces a hollow sound across the area.
Uniform.Use a notched trowel to control thickness, keep the stripe direction consistent, and keep thickness differences within an acceptable range. Thick areas have greater shrinkage stress, and thin areas do not bond firmly; neither extreme is good.
Opening hours.After the adhesive is applied, there is a period during which it remains usable; in hot weather or strong wind, this period is noticeably shortened. The judgment method is simple: if the adhesive no longer feels tacky to a light finger touch and the surface begins to skin over, it can no longer be applied. This is the rule most easily violated when rushing to meet deadlines.
VI. The fifth stage: bonding
The key actions for adhesion are "align, compact, and expel air." Align with the chalk line and press into place, then use a press plate to push from the center toward the edges to drive out the air. For curved surfaces and columns, start at the seam and work toward both sides.
The criterion for judging this step is "whether the edges lie flat." If the edges curl up, it means the adhesive amount is insufficient or the pressing was not thorough enough, and the piece must be lifted and re-applied—you cannot just press it down with your hand and call it done; the pressed-down spots will curl back up after a few days.
VII. The sixth checkpoint: pointing
Pointing is not "patching a line"; it is one of the system's waterproof layers. Three requirements: consistent joint width, fully filled and smoothed, and no voids. The pointing agent must be a matching product; cement slurry or ordinary putty must not be used as a substitute—the former will crack, and the latter will be washed away by water.
The timing of joint filling also matters: too early, and the adhesive has not yet cured, so the joints will be squeezed out of shape; too late, and dust and water have already gotten into the joints, making them hard to fill securely.
VIII. The Seventh Stage: Curing
The curing period is the stage most often sacrificed in projects with compressed schedules. Three things during the curing period: no water spraying, no impact, and no covering with heavy objects. Particular attention should be paid to exterior wall and ceiling areas, as scaffold removal and material handling may damage finished products during this period.
The length of the curing period is determined by the curing requirements of the adhesive and the on-site temperature, and must not be shortened based on experience. In winter, when temperatures are low and curing is slow, the curing period should be extended accordingly.
IX. Special topic on hollowing: how to inspect, how to judge, how to handle
Hollowing is the most common quality defect in thin-sheet finishes and deserves to be explained separately.
1. The harm of hollowing
Hollowing itself is not immediately dangerous, but it is the starting point of three problems: first, uneven stress—the edges of hollow areas become stress concentration points and gradually expand; second, water ingress channels—rainwater seeps in from the edges of hollow areas, causing efflorescence and freeze-thaw damage; third, detachment risk—once exterior wall and ceiling high areas detach, the consequences are serious.
2. Causes of hollowing
In summary, four causes: an uneven substrate leads to local areas without adhesive; incorrect adhesive application (spot bonding, missed application at edges and corners); the adhesive's open time has passed; the substrate's moisture content is too high or its strength is insufficient. The four causes correspond to four remedies; identify the cause first, then act.
3. Methods for checking hollow areas
The most practical method for on-site inspection is still the tapping method: tap lightly with a small hammer or a dedicated tapping rod. A solid, deep sound indicates solid backing; a hollow, dull sound indicates hollowing. The key is to tap point by point in a grid pattern, not to draw conclusions after a few random taps; any hollowing found should immediately be circled with chalk and numbered to facilitate statistics and rectification.
For projects with larger areas, sampling can be done by grid zones, with a fixed number of sampling points per zone, and the results recorded in a table. The value of this approach is that the hollowing rate is a quantifiable indicator; only with data can you determine whether it is a "localized defect" or a "systemic problem".
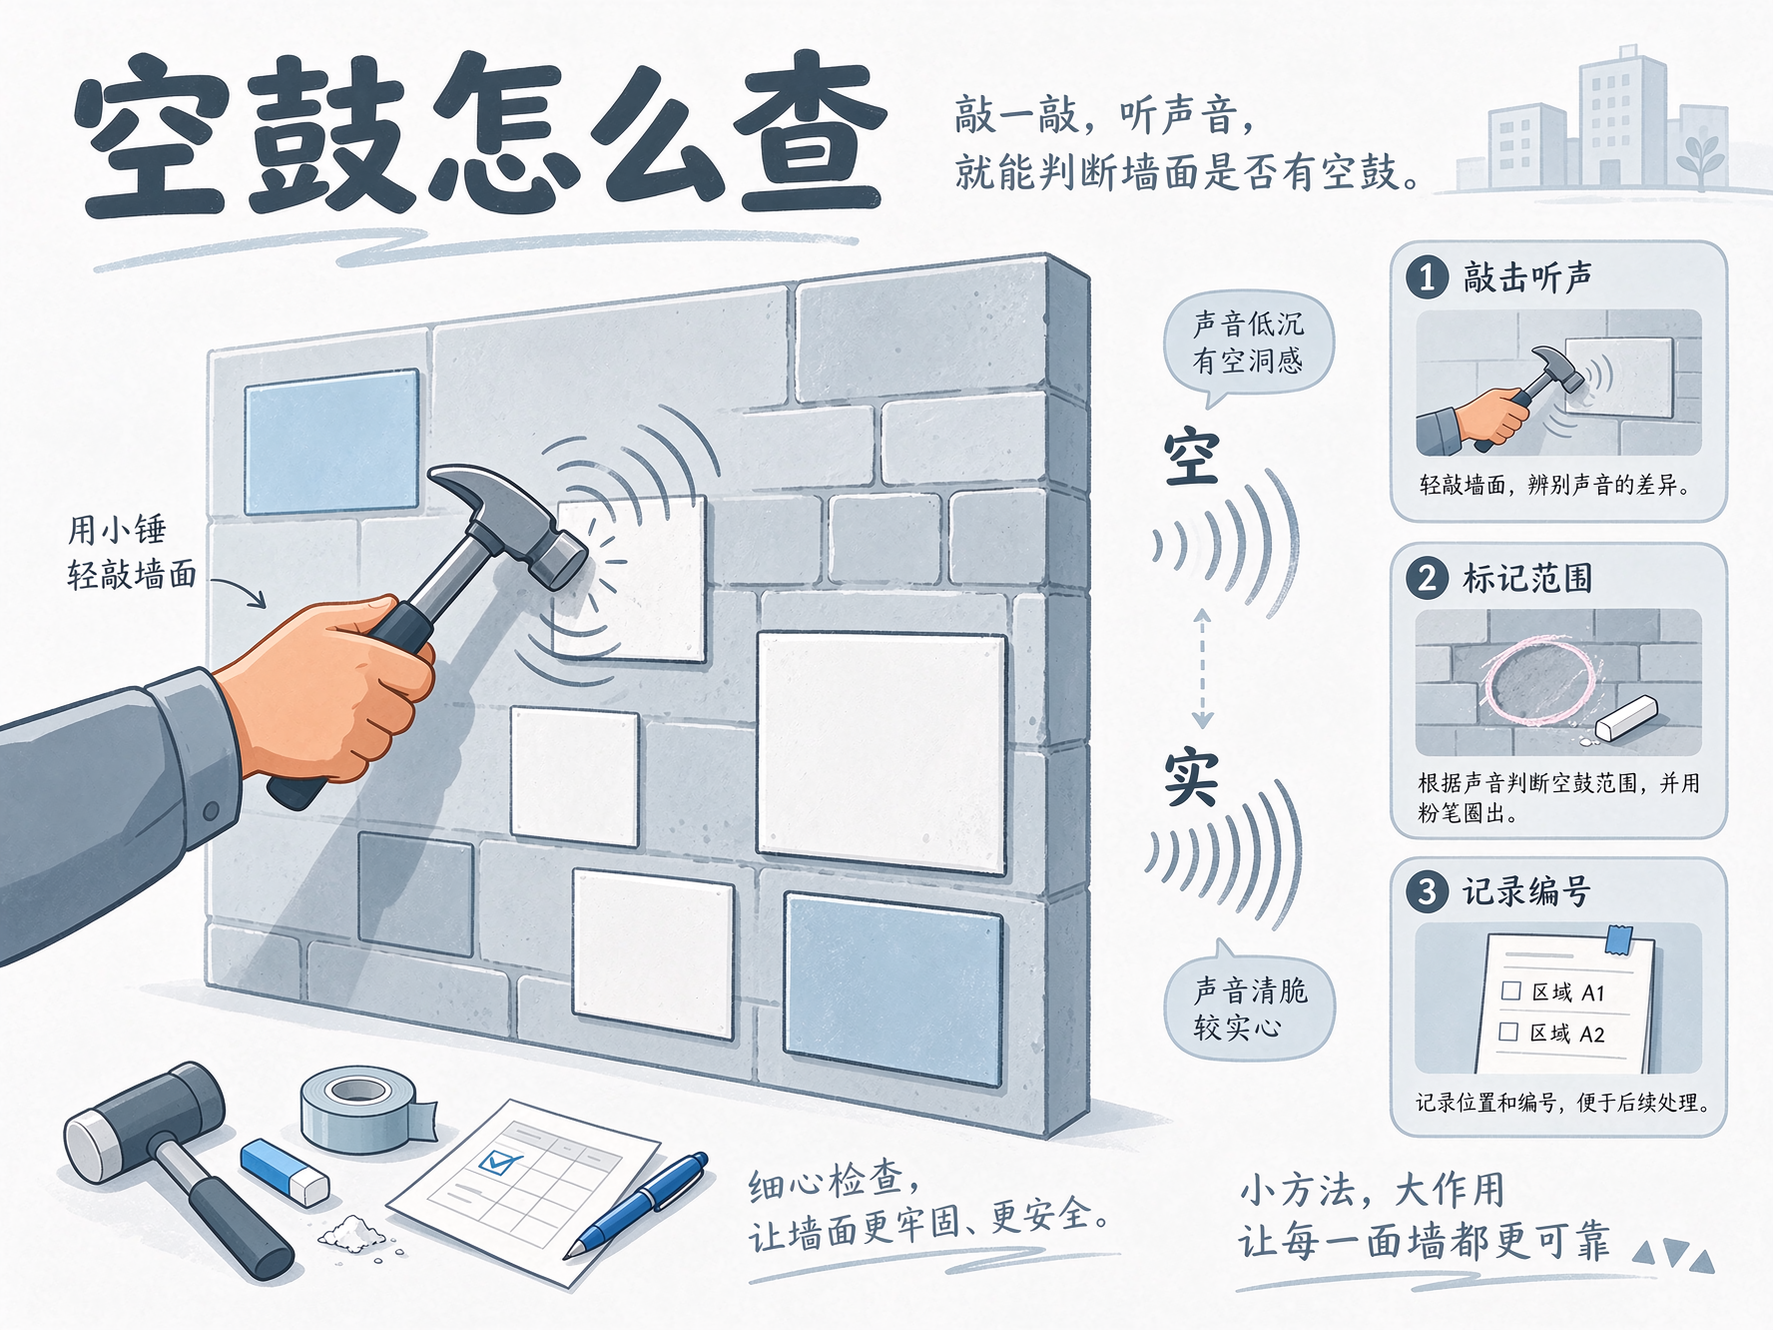
4. Treatment of hollow areas
Divide into three levels: small areas at edges and corners can be repaired by injection of adhesive and re-inspected; large-area hollowing and hollowing along seams should be removed and redone; hollowing on ceilings and high exterior walls should be treated as a safety hazard and removed first. After treatment, the location, area, cause, method, and re-inspection result must be recorded—without records, the next dispute will have to be investigated from scratch.
X. Closing: Where Problems First Appear
Closings include internal and external corners, junctions with other materials, junctions with the floor and ceiling, and openings and access panels. Three principles: at corners, use an overlapping relationship rather than a butt joint; between different materials, keep a clear interface (edge trim or reveal joint); all closings must have detail drawings.
The most common on-site mistake is "discovering there is nowhere to finish the edge while installing"—the cause is not workmanship, but failing to account for the termination position during layout. At the layout stage, determine: where the joints are left, where the edge trim is pressed, and whether the last piece is a full panel or a cut piece.
XI. Cost and Scope of Application
Whether construction costs are high depends on three things: the condition of the substrate, the proportion of irregular shapes, and how tight the schedule is. Poor substrates, many corners, and tight schedules naturally drive costs up; conversely, thin-sheet cladding inherently involves fewer process steps than dry-hanging systems, so its cost advantage will become apparent.
The scope of application is equally clear: it can be used on interior and exterior walls, and curved surfaces and irregular shapes are its strengths; it is not suitable for floors, areas subject to long-term water immersion, or components requiring structural load-bearing. This boundary should be confirmed at the material selection stage, not discussed halfway through construction.
XII. Five construction precautions
- Do not start applying adhesive before the substrate has been accepted; the cost of rework is far higher than waiting.
- Do not apply sheets to adhesive whose open time has passed; lifting and redoing is cheaper than pressing to remedy.
- Do not use ordinary tile adhesive or all-purpose adhesive in place of the matching bonding agent; there is no second chance once the interface fails.
- Do not allow foot traffic or construction during the curing period; the responsibility for protecting finished work must be written into the pre-construction briefing.
- Do not skip record-keeping; the locations of hollow areas, the treatment methods, and the re-inspection results must all be documented.
XIII. Six high-frequency on-site questions
Now that the process has been explained, what remains are the issues that will really hold people up on site. These six are asked about most:
Q: How many square meters can be applied in one day?This figure has no reference value, because what affects it is not hand speed but the preconditions. Only when the substrate has been accepted, the layout drawing has been issued, auxiliary materials are in place, and the work face is continuous can efficiency rise; conversely, more than half the day is spent waiting for the substrate, waiting for materials, waiting for setting-out lines. When judging the construction period, calculate by "effective work face," not by headcount.
Q: Is it necessary to have two people work together on large wall areas?It is recommended to work in pairs: one person applies adhesive, and the other positions and presses the sheet. The larger the single sheet format, the more necessary this coordination becomes—if one person both applies adhesive and installs the sheet, the adhesive will remain on their hands longer than the open time, and it will fail while installation is still underway.
Q: Can the large surfaces be applied first, followed by the columns and corners?Not recommended. Columns and corners are closure areas, and their layout determines the position of the joints. If the large surfaces are applied first, the column joints can only be accommodated, and narrow strips will inevitably appear in the end. The correct sequence is to determine everything uniformly at the layout stage and to advance construction in parallel.
Q: Can construction be carried out in rainy weather?Indoors is fine, but moisture must be controlled; for exterior walls and damp areas, construction in rainy weather is not recommended — a high moisture content in the substrate affects adhesive curing and increases the probability of efflorescence later. When the schedule is tight, it is better to wait a day than to rush that half day.
Q: When renovating an old wall, must it be stripped down to the structural layer?Check the condition of the existing surface layer. If it adheres firmly with no hollow areas, it can be covered after interface treatment; if it is peeling, powdery, or hollow, it must be removed. The criteria are the cross-cut test and tapping, not "it looks fine." For the complete method for renovation, see Renovation Wall Application Plan。
Q: How long after application can cleaning be done?and so on until the curing period ends. During cleaning, avoid directing a high-pressure water jet straight at the joints, and avoid strong acid or strong alkali cleaning agents; wipe with a soft cloth. Writing these three points into the handover instructions can reduce many later "damages not caused by quality issues."
One more thing worth mentioning separately: the briefing must be put in writing. An oral briefing gets retold three times on site, and by the third time it is guaranteed to be distorted. The written briefing does not need to be long—one page is enough: three requirements for the substrate, the models and usage basis for auxiliary materials, the names and acceptance points of the seven processes, and the prohibitions during the curing period. Workers can understand it, supervisors can check it, and if a problem arises, it can be traced back.
XIV. Next steps
To judge whether a project can be constructed smoothly, only three materials are needed: photos of the current substrate condition, a layout drawing, and the schedule milestones. With these three, it is generally possible to identify in advance which of the seven stages will become the bottleneck. For the matching of products and auxiliary materials, see Flexible stone product page, see auxiliary material reports at Adhesive、Adhesive、Pointing agent Three copies; for exterior wall parts, see separately Exterior wall fire protection boundaries; for the post-construction checklist, see the acceptance article in the same section; to conduct a construction briefing per project, go to Contact page。
Construction, in the end, is a sequence of steps that "cannot be skipped." The step you skip does not disappear; it is simply waiting for a more expensive moment to return.



 WhatsApp

 Guangdong Public Network Security Preparation No. 44200002005257
