

Conclusion first:Flexible stone can wrap cylindrical columns because it is a thin sheet that can bend (2–5mm, 3–7kg/㎡); cylindrical and curved walls can be wrapped in a single sheet, leaving only one vertical seam. But "can wrap" does not mean "wrap however you like"—the minimum bending radius must be confirmed by actual measurement for the specific model and thickness, and the termination details must be decided before work begins. If these two things are not done well, the wrapped column will certainly have creases.
First: determine whether this column can be wrapped
Not all cylinders are suitable for wrapping with thin sheets. Before starting work, go through five checks; if any one fails, the method must be changed:
- Diameter.For columns with too small a diameter, the curvature is too great, and bending stress concentrates in the sheet, making wrinkling or springback likely. The specific lower limit shall be determined by actual measurement for each model and must not be set based on experience.
- Substrate.Is the column substrate dense, free of hollow spots, and has it been leveled? Round columns are more prone to ovality error in the substrate than flat walls.
- Verticality.If the column is crooked, the applied joints will be crooked. Out-of-tolerance verticality must be corrected first and cannot be compensated by the adhesive layer.
- Part.Whether it is an indoor or outdoor column, whether it is load-bearing, and whether there are fire protection requirements. These determine the auxiliary materials and installation method.
- Closing conditions.Whether there is space for detailing at the column top, column base, and the junctions with the floor and ceiling. A column with no room for termination details will definitely look bad when finished.
II. Minimum bending radius: why a universal number cannot be given
"What is the minimum bending radius of flexible stone" is the most frequently asked question and also the easiest to fudge. The rigorous answer is: it depends on three variables—thickness, formulation and backing, and ambient temperature. Within the same series, 2mm and 5mm perform differently, and performance also differs between winter and summer.
So the correct approach is not to look up a number, but to do an actual test: take samples of the same batch and same thickness, wrap them at room temperature around cylindrical surfaces of different diameters (or a dedicated bending mold), and observe three criteria:
- Whether cracks or microcracks appear on the surface.
- Is there any wrinkling, bulging, or rebound?
- After bending, let it stand for a period of time and check whether edge lifting occurs.
The smallest diameter that all three pass is the usable lower limit for this model under this project's conditions. This conclusion must be written into the technical briefing and cannot be conveyed orally. Any statement that directly gives a single radius figure "applicable to all styles" deserves caution—different thicknesses and different formulations inherently cannot be the same.
III. Four steps for wrapping a round column
Step one: set out
Measure three data points: diameter d, circumference C, and column height H. Measure the circumference on site; do not calculate it as d×π—on-site columns are rarely a standard circle. Setting out must determine two things: which orientation the vertical joint is left on (usually in a blind spot out of sight or where it meets other materials), and the height of the top and bottom closures. This step sets the datum for all subsequent processes.
Step Two: Leveling
Grinding, repairing, and leveling the column surface to control ovality and verticality within the allowable range. Internal and external corner positions must be straight and must not have protrusions. After leveling, dust must be cleaned, and the next step can only proceed once the moisture content meets the standard. Leveling a round column takes more labor than a flat wall, and this time must be included in the schedule.
Third step: Paste
Wrap the entire sheet along the curved surface, starting from the seam position and advancing toward both sides, pressing and expelling air while applying. There are three key points: apply adhesive evenly, fully coat the edges, and work from the middle toward both sides. The sheet has rebound force on the curved surface; if it is not pressed firmly, it will lift.
Step Four: Sealing
Align, compact, and point the vertical joints; treat the top and bottom closures per detail nodes. The vertical joint is the only long joint on the entire column; how straight it is determines whether the column looks "whole" or "pieced together."

IV. Internal and external corners: two details that determine success
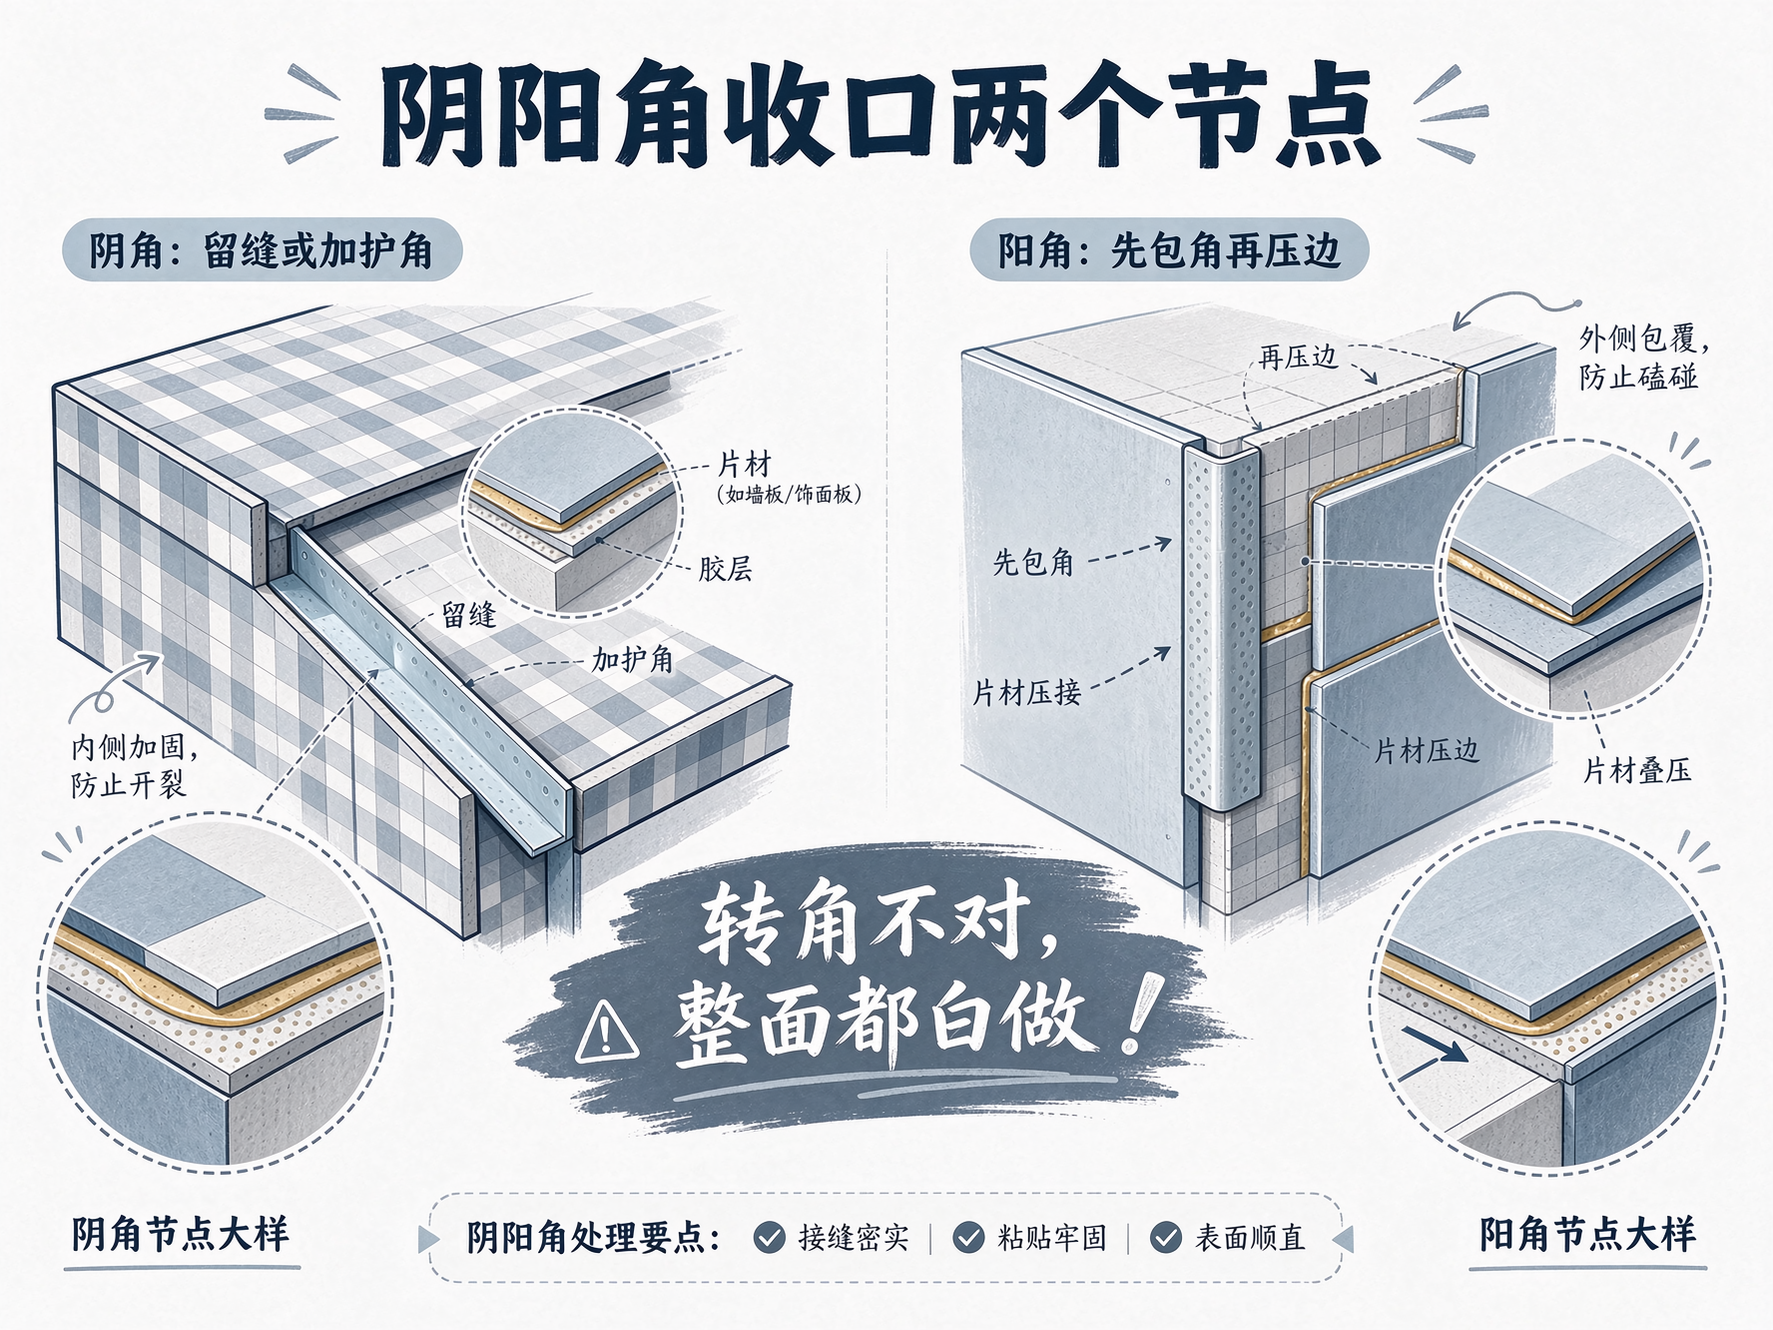
Corners are stress concentration areas and the places most prone to cracking. There are two basic approaches:
- Internal corner (an inward-facing corner).The whole piece can be folded over, or a gap can be left with a corner guard added. When folding the whole piece over, the fold line must be straight and there must be no cavity behind it; when leaving a gap, the gap width must be consistent and the jointing must be dense. Each method has its own applicable conditions, and which one to choose depends on whether this corner will be bumped.
- External corner (corner facing outward).It is recommended to wrap the corner first and then press the edge: wrap one side of the sheet over the corner and press it firmly, then press the other side over it to form an overlapping relationship. In this way, when external force hits the external corner, the layer being pressed bears the force, making it less likely to lift.
Detail construction methods must include large-scale detail drawings; you cannot "figure it out on site." On the same wall, if even one corner is handled carelessly, the overall appearance of the entire wall will be diminished.
V. Top and bottom closures: three methods for column tops and column bases
- Junction with the ceiling.A common practice is to leave a process joint or cover it with an edge trim. Butting directly against the ceiling without a gap will cause the sheets to be pushed up during thermal expansion.
- Interface with the ground.The column base is a high-incidence area for impacts. It is recommended to use stone, metal, or ceramic skirting as a transition, rather than running the thin sheet directly to the floor.
- Interface with other materials.At interfaces with wood veneer, metal, and glass, use edge trim or leave a gap; keep the interface clear and avoid the two materials pressing against each other.
VI. What determines the price of wrapping a cylindrical column
"How much does it cost to wrap one column" cannot be answered directly, because the pricing logic for round columns differs from that for flat walls:
- By developed area or by piece.It is more reasonable to price small columns per piece and large columns by developed area. With inconsistent bases, quotes cannot be compared.
- Special-shape surcharge.The construction efficiency of cylinders is lower than that of flat walls, and the labor unit price is usually higher; the smaller the diameter and the fewer the quantity, the higher the unit cost.
- Edge trim pieces.Edge trims, corner guards and pointing materials are measured by linear meter and are easily missed.
- loss.Layout waste on curved surfaces is higher than on flat surfaces, especially for small-diameter columns.
So when requesting a quote, provide all four items: diameter, height, number of columns, and termination detail. If you only say "wrap a few columns," the quotation you get back will inevitably be a guess. For the complete breakdown of cost composition, see Full life-cycle cost With the quotation article in the same section.
VII. Five points to note
- Do not promise a radius without actual measurement.Different thicknesses and different formulations vary greatly; a wrong commitment means rework.
- Vertical joint positions must be determined in advance.Once it is in the main viewing angle, even the best craftsmanship cannot save it.
- The ovality of the column substrate must be addressed first.If the column is not round, the cladding will not be round, and the adhesive layer cannot correct this error.
- Do not fix with nails or clips.Thin-sheet finishes rely on bonding; mechanical fastening creates point stress, which instead causes the surrounding edges to lift.
- Outdoor columns must take drainage and moisture protection into account.Water accumulation at the column base and rainwater seeping in along the joints are the most common problems for outdoor columns.
VIII. Three Common Questions
Q: Can square columns be done?It can be done, and it is simpler than a round column—four flat faces plus four external corners, handled according to the external corner detail. The difficulty with a square column lies in the straightness of the four external corners, not in the curvature.
Q: Should expansion joints be left when wrapping a column?Check the column height and orientation. Taller outdoor columns in environments with large temperature differences should be designed with joints or movement joints to avoid tensile stress across the entire panel.
Q: The surface of an old column has old paint; can it be wrapped directly?First, assess the adhesion of the old coating. Any peeling or powdering must be removed; where adhesion is sound, roughening and interface treatment are required. For the overall approach to renovation over existing substrates, refer to Renovation Wall PlanFor column sections, refer separately to Common Questions section check against the construction section.
Q: Can two pieces be joined to wrap a column?Yes, but the number of seams will increase to two. The criterion is the main viewing angle: if both vertical seams fall within the line of sight, the visual effect will be fragmented. Usually it is better to increase the coverage width of a single panel and reduce the number of seams than to force pieces together to save material.
Q: Are the methods for curved walls and cylindrical columns the same?The principle is the same; the difference lies in the direction of curvature. A curved wall is a one-way continuous curved surface, and the layout can be divided into sections by chord length; a cylinder is a closed curved surface, and a vertical seam must be left to close it. The node logic of the two differs, and the same node drawing cannot be shared.
Q: How long after wrapping a column before it can be touched?Determined by the curing time of the adhesive and the on-site temperature; usually a curing period is required before impact and water spraying are allowed. Projects with tight schedules must build this period into the plan, rather than letting other trades start work right after installation.
IX. How to calculate cylindrical layout and waste
The reason cylinders cost more than flat walls is half labor and half waste. The calculation is actually not complicated; it can be done clearly in four steps:
- Calculate the unfolded width.Add the overlap or joint width to the measured perimeter to obtain the developed width that a single piece needs to cover. Note: use the measured perimeter, not the diameter multiplied by pi.
- Calculate the quantity per piece.The number of pieces needed to cover a column is determined by the usable width of the panel. The more pieces, the more vertical joints, the more fragmented the appearance, and the higher the labor cost.
- List the sources of loss.Offcuts from curved-surface cutting, trims from the top and bottom closures, and adjustments when matching patterns at vertical seams—these three items are the main sources of waste for cylindrical columns.
- Calculate the batch coefficient.When there are many columns of uniform size, they can be cut in batches from the same layout, significantly reducing waste; a single shaped column offers almost no economy of scale.
Practical experience is: the smaller the diameter and the fewer the number of pieces, the higher the loss per unit of unfolded area; conversely, the closer it is to the level of a flat wall. Therefore, when requesting a quotation, state clearly "how many pieces, what diameter, and whether they are the same specification" so that the quotation can be close to reality.
Three additional requirements for outdoor columns
- Waterproofing takes priority.The column base and column top are water inlets; waterproofing and drainage must be done first before discussing finishes. No matter how well the finish is done, water pouring in from above will still cause damage.
- Edge trim materials must be correct.Metal trim pieces in outdoor environments must be selected according to anti-corrosion requirements; ordinary materials will rust first in salt-spray environments.
- Leave movement joints.For relatively high outdoor columns in areas with large temperature differences, joints should be left according to the design or expansion joints should be provided to avoid the entire panel being under tension for a long time.
X. Three Common Incorrect Practices
In on-site rework cases, problems with column wrapping are mostly not due to the material, but due to the following three practices:
- Apply the large surfaces first, then fill in the columns.Columns become a finishing task, and joints and closures can only be compromised. The correct sequence is to schedule columns and large areas together, and to fix the vertical joint positions of columns at the layout stage.
- Level with an adhesive layer.The column surface is not round or not straight, and you want to make up for it by thickening the adhesive layer. The thicker the adhesive layer, the greater the shrinkage stress, and the higher the probability of hollowing. Leveling must occur on the substrate, not on the adhesive.
- Purchase the closing pieces last.If edge trims and corner guards are not decided in advance, you only find out after installation that there are no matching pieces, and can only make do with sealant. Closing pieces should be ordered together with the main materials and matched according to the detail drawings.
What these three approaches have in common is that "the sequence is wrong." Column wrapping is a matter of sequence: setting out comes first, closure pieces at the procurement stage, and leveling before adhesion. Get the sequence right, and the process is actually not very difficult.
One last point about the schedule: for a standard cylindrical column, from setting out to completion of the termination, it usually takes one to two times longer than a flat wall of the same area, and this is even more pronounced when the quantity is small. List this part separately when planning the schedule; do not work backward to estimate manpower based on the per-square-meter efficiency for flat walls, otherwise there will certainly be a rush on the last day, and columns produced in a rush will certainly have crooked seams.
XI. Next Steps
To evaluate a specific column, four pieces of information are needed: diameter and height, substrate material and current-condition photos, indoor or outdoor, and how the edges are to be finished. With these four, a feasible construction method and a loss estimate can be provided. For product series and bendable styles, see Flexible stone product page, travertine and slate textures suitable for columns are shown in Travertine、Slate; for the actual methods for curved surfaces and columns, refer to Lobby gilded panel application plan; needs to be confirmed per project, proceed with Contact page。
In column wrapping, the hard part is not "whether it can bend" but "how to close it after bending." The radius is the entry point, but the nodes are the exit point—only when both ends are thought through is the column truly finished.



 WhatsApp

 Guangdong Public Network Security Preparation No. 44200002005257
