

Conclusion first:When flexible stone will not stick, nine out of ten problems are not in the sheet itself, but in the layer of adhesive in the middle and the substrate beneath it. The order of judgment should be: first check the substrate (whether it is flat, dry and solid), then check the adhesive (whether the type is correct, the amount is sufficient, and the open time has not passed), and only then suspect the material itself.
First: look clearly at the structure: three layers, with the middle layer being the most critical
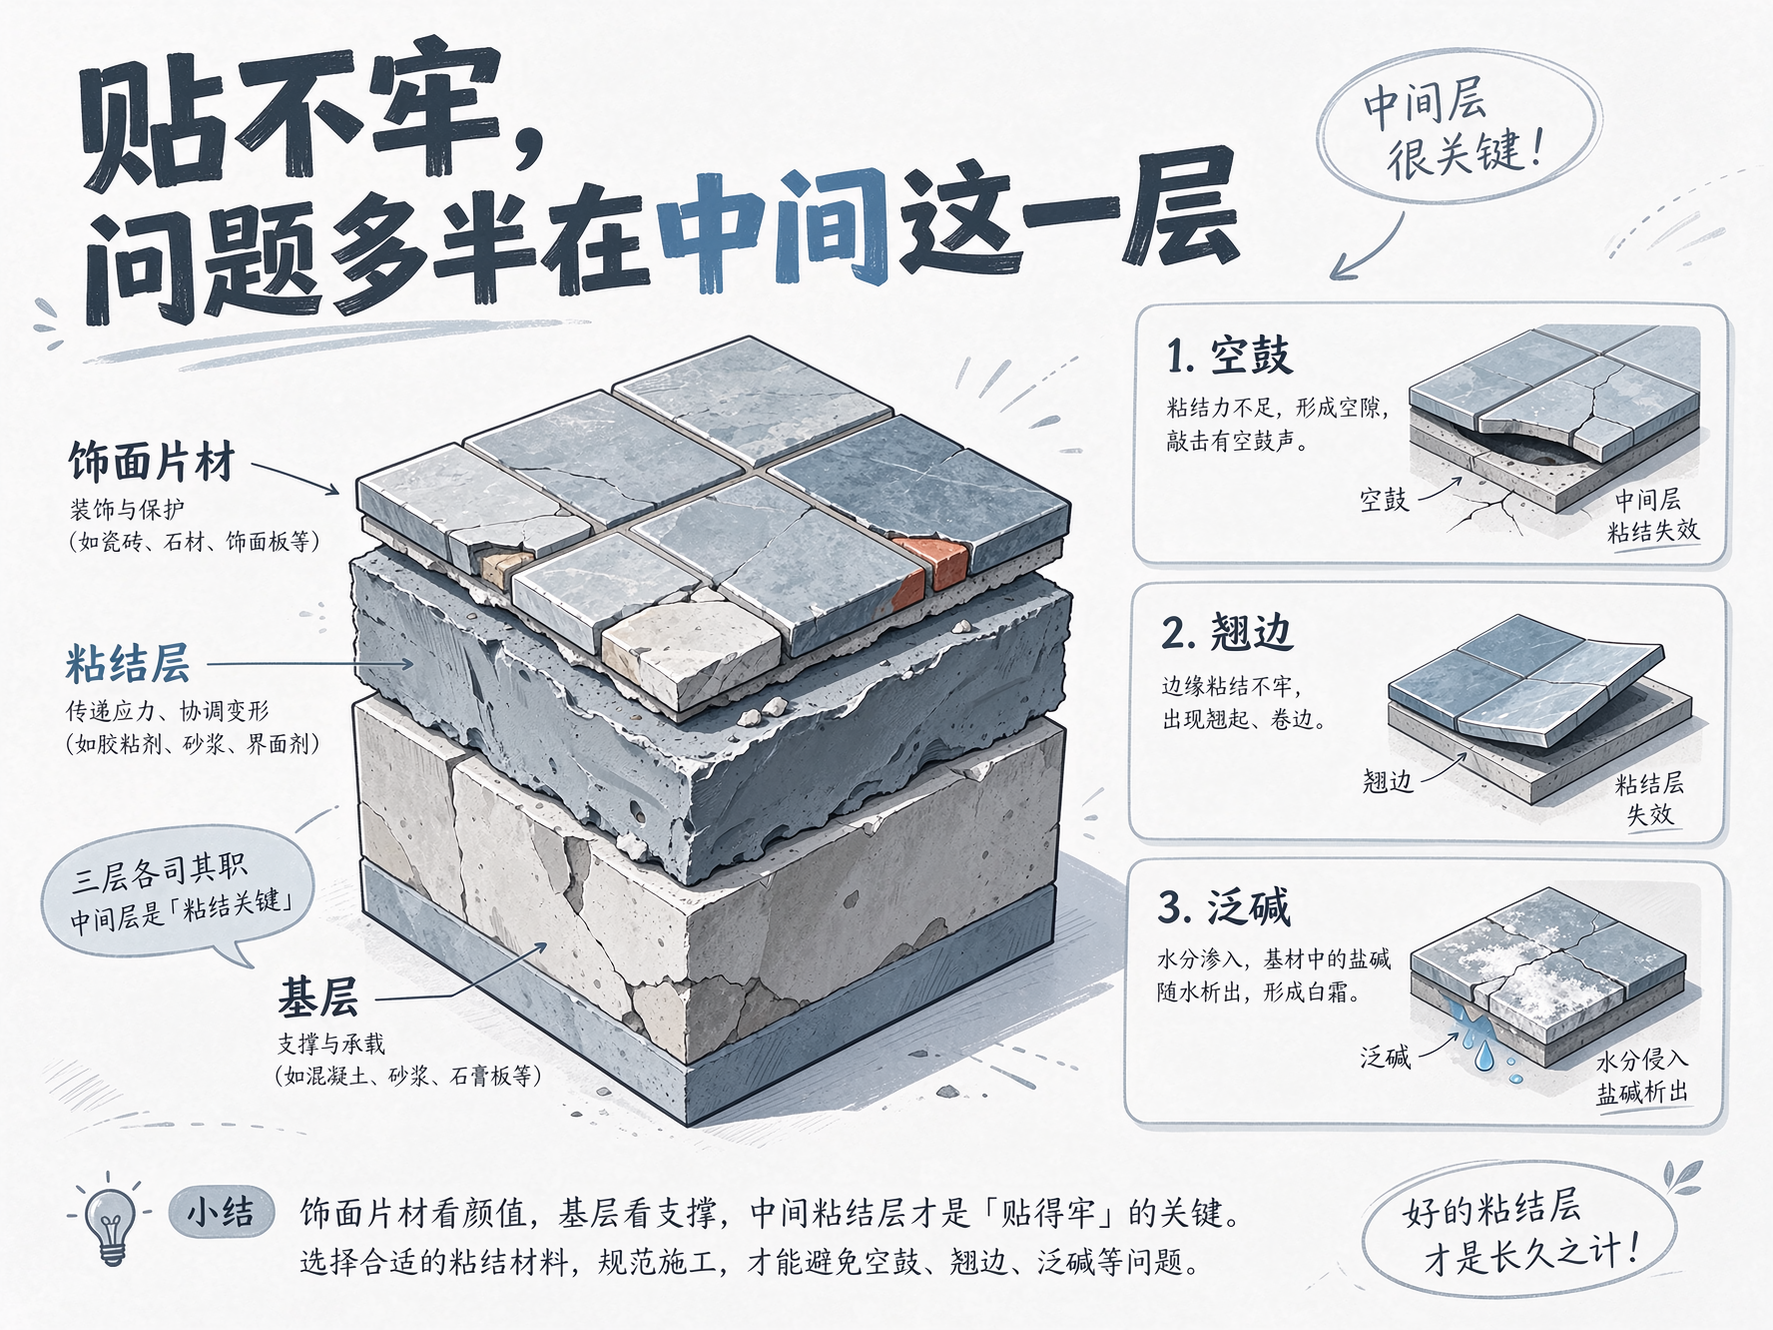
After flexible stone is applied to a wall, it is actually a three-layer structure: the outermost is a 2–5mm facing sheet, the middle is the bonding layer, and the inner is the substrate wall (plaster, putty, or substrate board). What the owner sees is the outermost layer, and what is seen when a problem occurs is the outermost layer, but what really determines whether it "stays attached" is the middle layer.
The division of labor among these three layers is very clear: the sheet material is responsible for appearance and protection, the substrate is responsible for load bearing and flatness, and the bonding layer is responsible for connecting the two and transmitting stress. The sheet material is thin, flexible, and light (about 3–7kg/㎡), and its deformation depends entirely on the bonding layer to adapt—so the bonding layer is not an "auxiliary material"; it is a structural component of the system.
II. Three common failure modes, and what each points to
1. Hollowing
A dull, hollow sound when tapped indicates that the sheet material is not firmly bonded to the substrate. There are three causes: an uneven substrate leaving localized areas without adhesive; an incorrect adhesive application method (spot bonding instead of full bonding); or the adhesive's open time having passed, so the surface skinned over and lost its bonding strength. Hollowing is not immediately dangerous in itself, but it is a precursor to subsequent edge curling and detachment, especially on exterior walls and ceilings, and must be addressed.
2. Edge curling
Edges and corners separate from the substrate first. The cause mostly lies in the finishing: edges and corners not compacted, insufficient adhesive, no edge sealing treatment at the edges, or repeated stress on the edges due to changes in ambient temperature and humidity. Once edge lifting forms, rainwater will enter along the seam and the problem will accelerate.
3. Efflorescence
White powdery deposits appear at joints or on the surface. The mechanism is that moisture carries soluble salts from the substrate to the surface, and the salts crystallize after the moisture evaporates. The root cause is not that the adhesive is "bad", but that water has entered the system: bonding when the substrate moisture content is too high, no waterproofing at joints, and insufficiently dense pointing. Therefore, to treat efflorescence, address the water first; merely wiping the surface is useless.
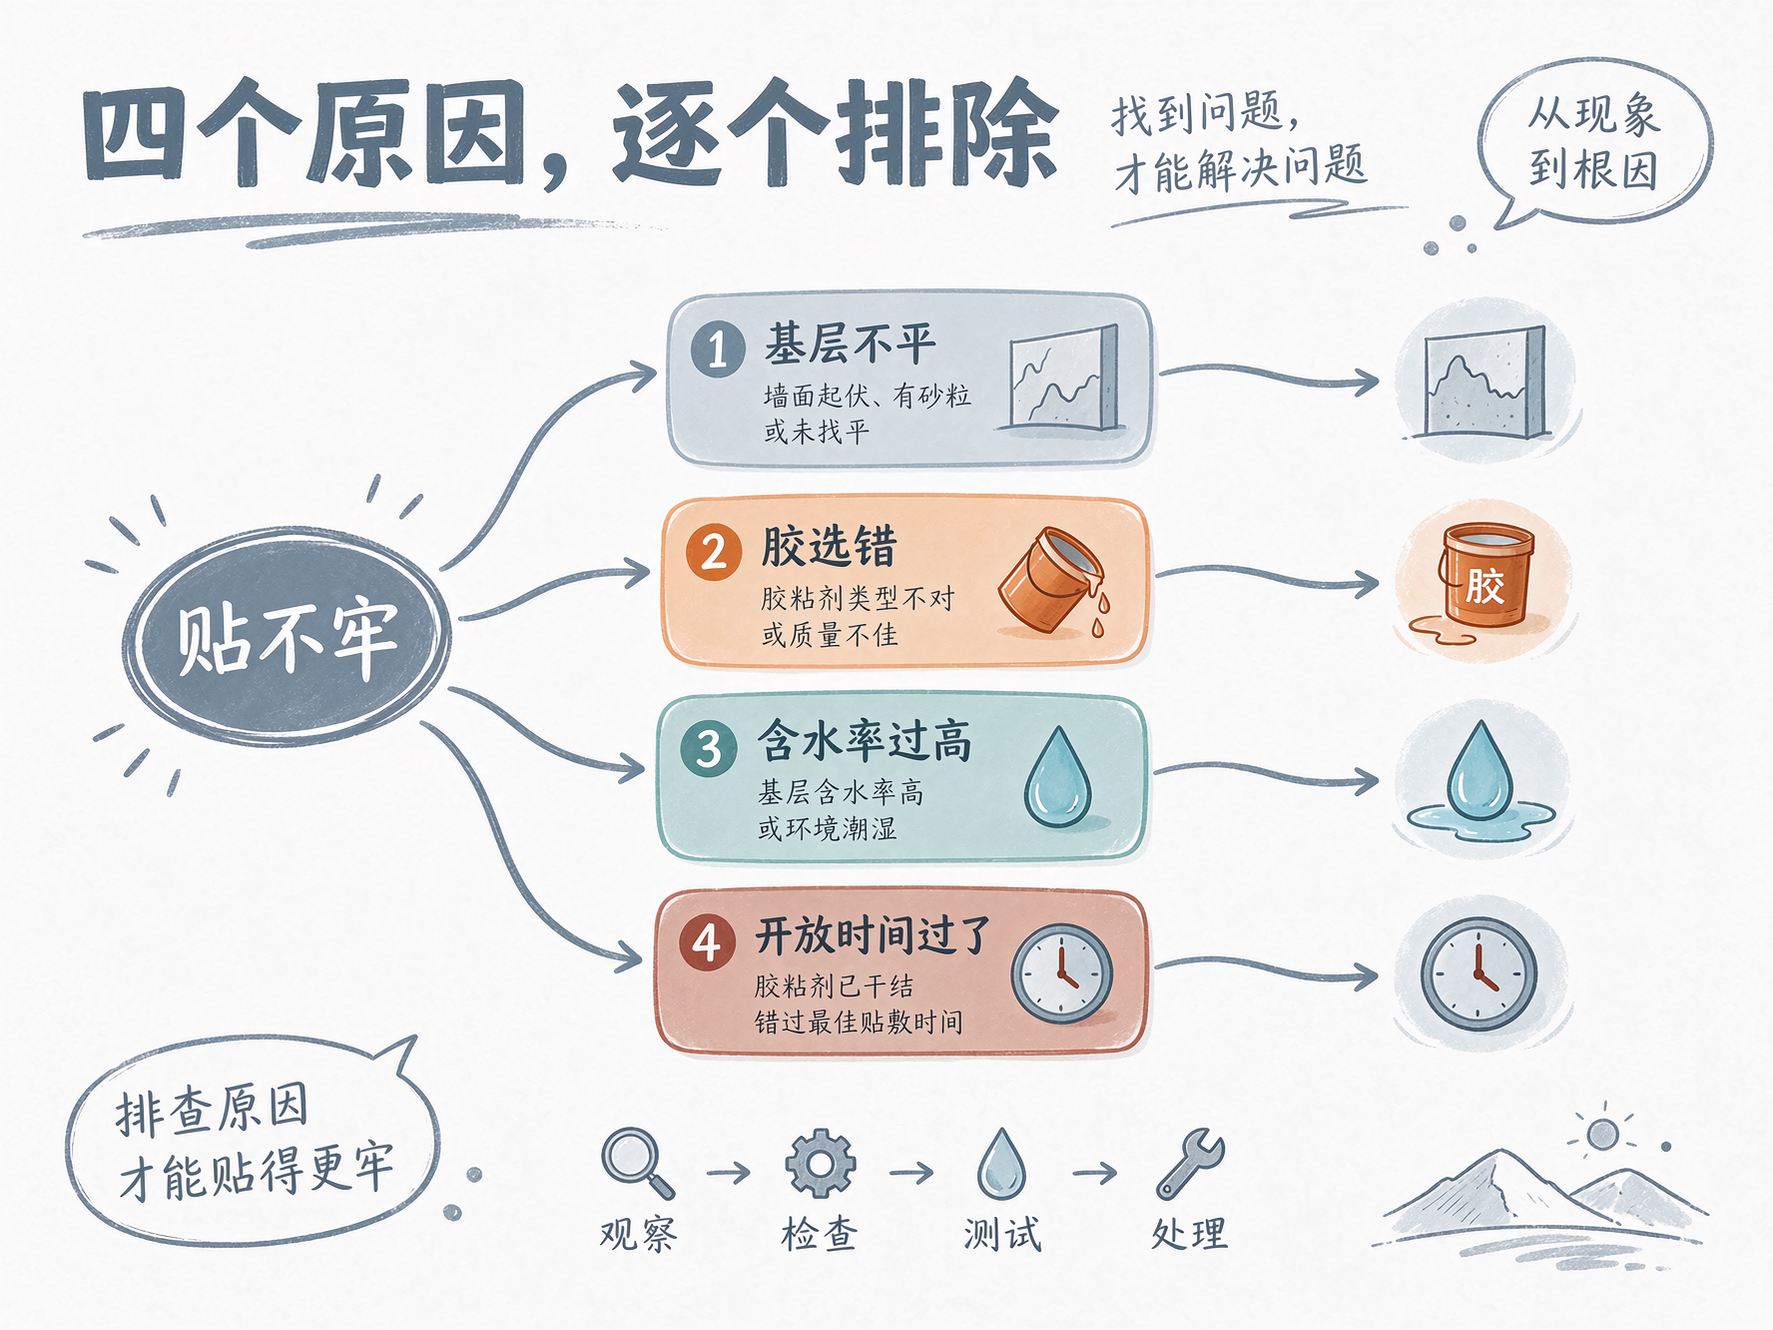
III. Four types of causes, eliminated one by one
Do not rely on feelings for on-site troubleshooting; follow these four steps in order for the highest efficiency:
- The substrate is uneven.Use a two-meter straightedge plus a feeler gauge to check whether it is out of tolerance and whether there are local depressions. If the substrate is uneven, no amount of adhesive will level out the waviness of the whole sheet.
- Wrong adhesive selected.Check whether the matching flexible adhesive is used, rather than ordinary tile adhesive or all-purpose glue. The sheets are flexible thin sheets, and the adhesive must be able to deform with them; a rigid adhesive will transfer stress directly to the interface.
- Moisture content is too high.Applying before the substrate is fully dry traps moisture inside; later heat expansion lifts the sheets and also causes efflorescence.
- Opening hours have passed.After the adhesive is applied, there is a period during which it remains usable; once this period has passed and the surface has skinned over, sticking the material on is equivalent to sticking it onto a film.
IV. Where the core advantages of dedicated adhesives lie
Why can't ordinary adhesive be used? The key lies in three words: flexible matching, no efflorescence, weather resistance.
- Flexible matching.The elastic modulus of the dedicated adhesive is closer to that of the thin sheet material, allowing it to absorb micro-deformation of the substrate and temperature stress, preventing stress from concentrating at a single point on the interface.
- No efflorescence.The formulation reduces the introduction of soluble salts and, together with sealing, lowers the risk of efflorescence caused by moisture migration. Note: the adhesive itself not causing efflorescence does not mean the system is watertight; waterproofing and joint filling are still required.
- Weather resistance.It maintains bond strength under long-term hot and humid conditions and freeze-thaw cycles, which is where ordinary adhesives most easily fail.
There are three auxiliary material reports available for reference for this system on this site, and the numbers can be checked directly at the time of purchase: one-component soft porcelain adhesive JXT2026SD223120209 (Report page), liquid soft porcelain adhesive JXT2026SD223120208 (Report page), grout JXT2026SD223120212 (Report page). The three are viewed together because they are inherently one system; testing only one of them cannot demonstrate the whole.
V. How to understand the "service life" of adhesives
Many people ask "how many years can the matching adhesive be used". The accurate statement is: the service life of the adhesive is not an isolated number; it equals "the weather resistance of the adhesive × the stress on the interface × the ambient humidity and temperature". Of the three variables, only the first is a material parameter.
In practice there are three observation points:
- On walls in dry indoor environments with a stable substrate, interface degradation is the slowest.
- On exterior walls, damp areas, and locations with large temperature differences, interface degradation accelerates noticeably, so inspection frequency should be increased.
- Where pointing is not dense and water enters at the joints, problems often appear first—the problem lies in "water," not in the adhesive.
So when discussing the life of the adhesive, ultimately you still have to return to the system: whether the substrate is dry, whether the joints are tight, and whether water can drain away.
VI. Four selection questions — answer them and you won't buy wrong
- Where is it used?Interior walls and exterior walls, as well as damp areas, have different formulation and performance requirements; one product cannot cover all of them.
- What is the substrate?Plaster, concrete, gypsum board and old tile surfaces require different interface treatments and adhesive types.
- What determines the usage quantity?Determine according to the product instructions and substrate conditions, and control the thickness with a notched trowel; do not rely on feel. Insufficient dosage turns full bonding into spot bonding.
- Do you have reports?The model, batch and test report number must match up; it cannot be just the words "special adhesive".
VII. Construction process for the matching adhesive
The process itself is not complicated; the difficulty lies in not cutting corners at every step. In order, there are seven steps:
- Substrate acceptance.Strength, flatness, moisture content, and the presence of hollowing and dusting, checked and recorded item by item. If this step is skipped, everything afterward becomes remediation.
- Substrate treatment.Repair hollow areas, scrape off dusting, and sweep away loose dust; apply a primer/bonding agent if necessary to improve adhesion.
- Chalk-line layout.Snap lines according to panel size to determine the starting point and joint positions, avoiding discovering halfway through installation that the joints are crooked.
- Apply adhesive.Apply by the selected method, draw out uniform stripes with a notched trowel, keep the thickness consistent, and the edges all around must be fully coated.
- Installation and compaction.Align with the chalk line and press to attach, then use a press board to expel air and compact from the center toward the edges, ensuring full adhesion with no voids.
- Joint treatment.Leave joints as designed, fill solid and trowel smooth with the matching pointing agent, keeping joint width and depth consistent.
- Cleaning and maintenance.Remove residual adhesive from the surface promptly, and avoid water exposure and impacts within the specified time.
Of the seven steps, the first and fifth are the ones most easily skipped: substrate acceptance is often waved through with "it looks fine," and compaction is often waved through with "one press and it's done." These two steps are precisely the two main sources of hollowing.
VIII. What to Do If Hollowing Has Already Occurred
Handle according to three cases; do not remove and redo everything indiscriminately:
- Small-area debonding at a single point (corners, local areas).Drilling and glue injection can be followed by compaction, and surface repair should use the same batch color number. After repair, a knock-check re-inspection should be carried out.
- Localized hollowing, sometimes accompanied by edge lifting.This area should be removed, the substrate re-treated, and then bonding carried out. Widespread hollowing indicates that the interface has failed overall, and injection of adhesive cannot save it.
- Hollowing (debonding) at ceilings and high exterior wall areas.Treat it as a safety hazard and prioritize removal; it is not advisable to keep it for observation. If such a location falls off, the consequences are serious.
After treatment, records must be kept: location, area, cause assessment, treatment method, and re-inspection results. A repair without records is the starting point of the next dispute. For inspection methods for hollow substrate, see the site Common Questions section There is a dedicated article covering testing and determination.
IX. Three common questions
Q: Is the adhesive more firmly bonded the thicker it is applied?No. If too thick, shrinkage stress will develop inside the adhesive layer, making hollowing more likely; if too thin, it cannot fill the minor undulations of the substrate. The correct approach is to control the thickness according to the instructions and ensure full adhesion.
Q: Can construction be done in winter?Yes, but construction must be carried out within the temperature window allowed by the product. Low temperatures will extend curing time and shorten open time. The on-site process rhythm must be adjusted, and summer practices cannot be copied directly.
Q: Can it be applied directly onto the surface of old tiles?It can be assessed, but only on the premise that the old tiles are not hollow or debonded, the surface is roughened, and a compatible interface material is used. Covering old tiles without treating hollow areas is equivalent to sealing the problem inside. For the complete renovation method for old buildings, see Renovation Wall Application Plan。
Two questions that are asked most often on site and are also the easiest to get wrong:
Q: Can cement or sand be added to the adhesive?No. Adding admixtures will disrupt the formulation balance and change the flexibility and water resistance. In the short term it may look like material savings, but in the long term it is a source of hollowing and cracking. Any on-site "self-mixing" practice should be prohibited; the mixing ratio must follow the product instructions only.
Q: If a small amount of hollowing is found after installation, should everything be removed?No need. Treat by area and location in tiers: small areas at edges and corners can be repaired by injection grouting, and after repair a knock-check re-inspection must be performed; extensive hollow areas, and hollow areas on ceilings and at heights, are treated as removal. The key is to keep records—location, area, cause, treatment method—otherwise the same location will be repeatedly found and repeatedly argued over during the next inspection.
X. Different Substrates, Different Treatments
The adhesive is only half of the system; the other half is the substrate. Different substrate types require different interface treatments, and this is where "one method applied to everything" is most common on site:
- Cement plastered wall.This is the most common and easiest to handle, but first confirm the strength and check for hollow areas. Any sandy, crumbling areas must be removed and given a primer treatment; otherwise, the adhesive bonds to loose sand, which is the same as not bonding at all.
- Concrete wall surface.The surface is dense with low water absorption, making it prone to "adhesive not sticking." Roughening treatment or a dedicated primer is usually required to increase mechanical interlocking.
- Gypsum board and lightweight partition walls.The substrate itself has low strength and is prone to moisture, so the focus is on joint treatment and overall stiffness. If the joints are not properly treated, the sheets will crack along the joints.
- Old tile surface.Covering is possible, but only on the premise that the old tiles are not hollow or debonded, the surface is roughened, and a suitable interface material is used. Covering old tiles without treating hollow areas is equivalent to sealing the hidden risk inside.
- Old paint surface.First conduct an adhesion test. Any peeling or powdering must be removed entirely; firmly adhered areas should be sanded and given a primer treatment. The criterion is a cross-cut test, not "it looks fine."
Among the five types of substrates, the first two determine 80% of the work volume, and the last three determine 80% of the disputes. This is especially true for renovation projects—when quoting, it is calculated as a "new wall," but after entering the site, it is found to be old brick or old paint; once the method changes, the cost changes.
XI. How to Write the Auxiliary Materials List into the Contract
For projects where auxiliary materials have problems, looking back almost always reveals a common factor: the model was not clearly specified in the contract. To avoid this, simply lock down five items during the procurement and contract stages:
- Model and brand.State the specific product model; vague statements such as "replacement with equivalent quality" are not acceptable.
- Basis for usage quantity.Whether measured by square meter or by kilogram, state the unit and consumption basis clearly to avoid disputes at settlement.
- supporting relationship.Whether the primer, adhesive and grout belong to the same system; cross-system mixing must be justified separately.
- Inspection documentation.Require report numbers corresponding to the model to be provided as delivery attachments.
- Batch consistency.For the same project, try to lock in the same batch; replenishment requires advance notification and retained samples for comparison.
Writing these five items into the contract is far more effective than arguing during acceptance over "whether it's a problem with the adhesive." Auxiliary materials account for a small share of the total cost, but they determine whether the other eighty percent of the cost can hold up.
XII. Next steps
If you are currently dealing with a project where the material will not stick firmly, the most effective action is: take three photos (the hollow area, the substrate cross-section, and the adhesive layer condition) plus one sentence of description (location and time), and you can determine which type of failure it is. For the matching relationship between products and auxiliary materials, see Flexible stone product page; see testing materials at Qualifications and reports page; the bonding system needs to be confirmed according to project conditions, see Contact page。
Whether it stays firmly attached has never been a matter for the material alone. It is a joint effort of the substrate, the adhesive, and the workmanship—when all three are in place, the wall will sit quietly there, making no sound for many years.



 WhatsApp

 Guangdong Public Network Security Preparation No. 44200002005257
