

Last year I looked at the entrance of a commercial complex in Quanzhou. The designer drew an R800 arc on the drawing, paired with flexible stone; in the rendering it was a smooth continuous surface. The team leader pressed a panel onto the curved substrate; the panel did not crack, but the edge lifted by two centimeters and sprang back when released. The problem was not the panel but the substrate—an arc assembled from wood battens and nine-millimeter boards had too many fold lines, and the panel could only follow the fold lines.
Whether flexible stone can bend is too broad a question. What needs to be asked is: to what radius can it bend, in which direction, and whether its appearance still holds after bending. The following proceeds along four aspects: principle, conditions, methods, and prohibited areas.
It can bend, but this statement needs to be paired with a radius
First, the conclusion. Flexible stone is a single-curved-surface material; it can bend, but not arbitrarily. Its flexibility comes from thickness and backing, not from the "material being soft." This is easy to misunderstand; many people think soft stone is like rubber and can be wrapped around anything.
A board 3 mm thick, with a layer of fiberglass mesh cloth laminated on the back. When it bends, the outer side is in tension and the inner side in compression; the inorganic powder layer resists compression but not tension, and what truly holds it is that mesh layer. So if bent too far, the first thing to fail will definitely be the outer surface—first whitening, then fuzzing, and finally cracking along the bend line. This critical point is the minimum bending radius.
The industry habitually discusses this using the ratio of radius to panel thickness. Conventional products generally fall between 60 and 100 times; a 3 mm panel corresponds to 180 to 300 mm; the deeper the texture and the denser the backing, the larger the value. This is not a standard clause but an empirical range; for specific models, the manufacturer's written instructions and bend test results shall prevail.

What exactly is inside a three-millimeter panel
Break a panel and look at the cross-section: from outside to inside there are roughly four layers: surface coating, inorganic mineral powder layer, fiberglass mesh, and back coating. The total thickness is mostly 2 to 4 mm, and the surface density is 3 to 5 kg per square meter.Flexible stone product categoriesThe thickness of each series varies, so confirm before ordering; a 1 mm difference in thickness means a different bending method.
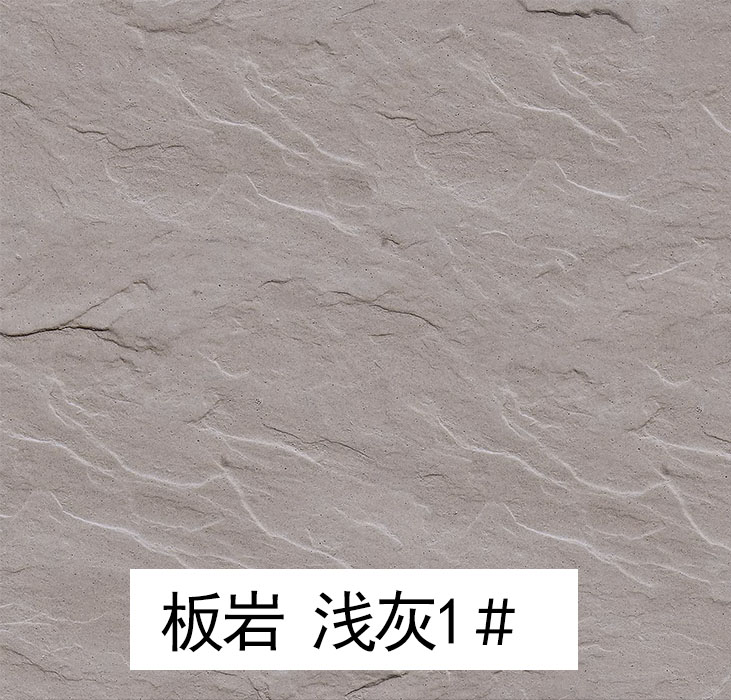
Also 3 mm,Travertine seriesThe bending method differs from that for slate. Travertine has shallow surface pores and small texture undulations, so the strain distribution during bending is relatively uniform; slate has a split face, and the height difference between peaks and valleys can reach one to two millimeters. The protruding positions are subjected to tension first, so the radius must be increased. The horizontal rammed-layer lines of rammed earth panels follow the same principle: bending along the rammed-layer direction is easier than bending across it. If bent the other way, the rammed-layer lines act as a row of pre-cracks.
I generally do not accept verbal promises like "our product can bend to a 100 mm radius." I ask them to take a scrap piece, wrap it once around a PVC pipe of the corresponding diameter, secure it with tape, leave it for 24 hours, then unwrap it and check three things: whether the outer surface has turned white, whether there are fine cracks, and how much it springs back. Only when all three pass do we talk about layout. The cost of this trial bend is one waste panel; skipping it costs a whole wall.
The minimum bending radius depends on three variables
Panel thickness comes first. Thin panels have less strain and can bend; thick panels have greater stiffness, and at the same radius the tensile stress in the outer layer doubles. So for the same curved area, if 2.5 mm works, don't use 3.5 mm—provided the substrate flatness keeps up: the thinner the panel, the less it can hide the ridges underneath.
Texture and backing are the second factor. For deeply textured panels, the raised areas effectively add an extra layer of thickness, so the actual strain is greater than the nominal thickness would suggest. The density and weight per unit area of the backing mesh also directly affect tensile resistance; on panels with sparse mesh, you start hearing a "rustling" sound when the panel is only half bent—that is the fibers breaking.
Temperature and time are the third point, and also the most easily overlooked. Cold bending on a wall below 5 degrees makes cracking more likely at the same radius. For winter construction, move the panel into a heated room one day in advance, or use a heat gun to heat it evenly along the bending line to above 15 degrees before bending; do not heat a single point. Panels that have been exposed to the sun in summer are too soft, and the shape will not hold after bending, so they must also be cooled first.
Springback is another matter. Flexible stone will spring back a little after being bent; if you only press it by hand during installation, the edges and corners will definitely lift. The method is to hold it in place with wooden strips, sandbags, or a dedicated support bracket, and remove them only after the adhesive has initially set. This step is especially critical at the finishing edges of wrapped columns and curved walls; those two centimeters that lift cannot be covered up later no matter how much sealant is applied.
Curved-wall setting out: measure the structure first, then check the drawings
The arcs on architectural drawings are ideal arcs, while the on-site structure is a measured arc, and the two often do not match. My habit is to measure first, then set out. Stretch a chord, measure the sagitta at the midpoint, and back-calculate the radius from the chord length and sagitta, taking one measurement point every 1.5 to 2 meters. For arc walls formed by a single concrete pour, a deviation of plus or minus 30 mm is very common; for arc walls of masonry plus plaster, a difference of 50 mm is not unusual.
Only after measuring can you tell whether this arc is actually "a single circular arc" or "an approximate arc made of several straight segments joined together." The latter also appears as an arc on the drawings, but on site it is a row of flat planes, and the panels must be bent in a completely different way. In this case, first apply a layer of arc-shaped leveling to smooth the polyline into a true curved surface, and only then discuss panel installation.
Setting out is done in three steps: define the arc, divide into panels, and number them. Divide the panels from the midpoint outward to both sides; do not work from one end to the other, because by the time you reach the far end there will inevitably be a narrow, unsightly strip left in the internal corner. Number them as "which ring, which panel" and write it on the back of the panel, then take them according to the unfolded drawing when installing on the wall. This method is crude, but much faster than figuring it out on site.
Base layer: keel, board and that relief groove
The construction of a curved substrate differs from that of a flat surface. The spacing of vertical keels is generally reduced to 300 to 400 mm, and horizontal keels are arranged according to panel height; the sharper the curve, the denser the keels. The keels themselves must first be bent into a curve, either by rolling with a plate-rolling machine or by notching and bending on site; the panels must not be relied upon to "pull" out the curve—the panels do not have that much strength, and what gets pulled out is a row of ridges.
Panel selection has hard rules. For outdoor areas, bathrooms, and roof perimeters, always use 6 to 8 mm cement pressure board or calcium silicate board; 9 mm flame-retardant plywood can only be used in dry indoor areas, and must be coated with fireproof paint. Plywood delaminates and bulges after moisture exposure, and panels adhered to it then hollow as well; I have seen this rework more than once. Panel joints must be offset from the keel, with a joint width of 3 to 5 mm, and the joints filled with elastic sealant.
Relief grooves are a key process for curved substrates, and many people omit them. Cut grooves into the back of the panel along the bending direction, at a spacing of 20 to 30 mm, with a depth not exceeding two-thirds of the panel thickness, and with the groove openings facing inward. With grooves cut, the panel can bend and conform; if bent forcibly without grooves, a row of transverse ridges will appear on the panel surface, and after installation it will look wavy from the side. When the radius is less than 800, this process cannot be omitted.
If the radius is even smaller and a single-layer panel cannot be bent to fit, use two thin panels laminated and bent together, for example two 4 mm layers, with white latex or structural adhesive applied fully between the layers, laid with staggered joints, and weighted down for 24 hours. The laminated bend is smoother than a single layer, at the cost of doubling the thickness, so flatness must be checked more carefully. For acceptance, check with a 1 m long curved template; keep the gap within 2 mm, and if it exceeds this, sand or apply putty.

Column wrapping: the horizontal joint is the hardest line to conceal
For column wrapping on a cylinder, the horizontal seam is a closed circle. This circle must be at the same elevation; measuring upward layer by layer will inevitably cause deviation. The method is to use a laser level to project a reference line around the column, and measure each horizontal seam upward from this line. Do not trust the reading from wrapping a tape measure around the circumference—wrapping around itself introduces error.
Panel width should be selected according to column diameter. For column diameters of 600 to 800, use a panel width of about 300, with 6 to 8 pieces per course; for column diameters of 1 meter or more, the panel width can be 400 to 600. Dividing the circumference by the panel width will always leave a remainder; make the remainder into a separate narrow panel and hide it on the shaded side or the side against the wall. Never spread the remainder evenly across every panel—after spreading, every panel has to be cut on site and the joint widths all go out of alignment.
Vertical joints must be staggered, offset by half a block. Aligned vertical joints on a cylindrical column will form a straight line and be more conspicuous than horizontal joints. Only when the starting positions of the upper and lower courses are offset does it visually feel "built" rather than "wrapped."
When the column diameter is less than 400, one panel cannot wrap a full circle, and rigid wrapping results in bulging on both sides. In this case, switch to two butted panels, place the joints on both sides of the column, and keep the face directly in the line of sight intact. Do not let the cut edges of the panels show at the column capital and base; cover them with metal edge trim or a ring of stone molding for a clean finish that is also less prone to impact damage.
Unfolded view: the grid deforms on curved surfaces
The unfolded cylinder is a rectangle; the unfolded area of this curved wall is "arc length multiplied by height," not "chord length multiplied by height." How much difference does it make? For R3000, with a central angle of 90 degrees corresponding to the arc length, the arc length is 4712 mm and the chord length is 4243 mm, a difference of 469 mm—nearly half a meter. If panels are laid out according to chord length, there will definitely be a shortage of one row by the time installation is finished.
What is more troublesome is the pattern. In the unfolded drawing, the vertical seams look equally wide, but when applied to a curved surface, each panel occupies the same arc length while the chord length differs; viewed head-on, the panels in the middle appear wide and those on both sides appear narrow. This is not an illusion; it is geometry. When laying out, adjust the seam density slightly toward both sides, and it will look more even visually.
Panel width is also limited by the radius. As a rule of thumb, the panel width should not exceed one-sixth of the arc length of the curved segment it sits on; beyond that, the middle of the panel bulges and cannot be pressed down firmly. The smaller the radius, the narrower the panel—this is the biggest difference between curved-surface layout and flat layout. For textured panels, such as the bedding of travertine,Cloth-texture stonethe grain direction, and the direction must also be clearly marked on the unfolded drawing. At corners, the material must "wrap around"; it cannot suddenly turn at the corner.
Which parts can bend, and which parts should not be forced
Putting common locations in one table makes the judgment much clearer. This table is based on conventional products and conventional practices; specific projects still depend on panel thickness, texture, and substrate conditions.
| Part | Common practice | Judgment | What to pay attention to |
|---|---|---|---|
| Large-radius curved wall (R≥1500mm) | 3mm panels for direct bonding | Applicable | Lay out according to arc length, with horizontal joints aligned to floor levels. |
| Medium-radius curved wall (R 600–1500mm) | Keep the panel width within 300, and cut relief grooves in the substrate | Available | Relief grooves cannot be omitted; densify the keel |
| Small-radius curved wall (R 200–600mm) | Double-layer thin panels laminated and bent, with special flexible adhesive | Conditional | Must test the bend first and keep a sample section |
| Cylinders (diameter ≥600mm) | Full-board wrapping, 6–8 pieces per course | Applicable | Horizontal joints set to a unified elevation using a laser |
| Cylinders (diameter 300–600mm) | Two pieces paired, seams placed on both sides | Conditional | Keep the face as a whole panel; use trim lines for the edges |
| Cylinder (diameter <300mm) | — | Not recommended | Large rebound, difficult to close the seam |
| Square column with small rounded corners (R50–100mm) | Metal corner guards or trim transitions | Not suitable | Sharp bends are prone to whitening and cracking |
| Single-curvature barrel vault (along the generatrix direction) | Curved-following installation | Applicable | can only bend in one direction |
| Double-curved surfaces, spherical surfaces | — | Cannot do | Flat materials cannot conform without stretching |
| Acute external corner (<60°) | Mitered corner joining or metal edge trim | Not suitable for full-board wrapping | Seams at corners are the hardest to handle |
| cantilevered and load-bearing components | — | Not applicable | The finish layer does not participate in load bearing |
The last two rows in the table are the easiest to overlook. Some people use flexible stone for the underside of canopies or for the overhanging parts of decorative trim, thinking that because it is light, they can just stick it on. The finish layer does not bear load; this is determined by the material's properties. Overhanging parts require a separate framework, and the panel is only responsible for the surface.
Shapes that cannot be done: spherical surfaces, double-curved surfaces, and that acute angle
Spherical and doubly curved surfaces cannot be done, and the reason is not that the craftsmanship is insufficient—it is geometry. To apply a flat material to a doubly curved surface, it must be stretched or compressed, and flexible stone has a limited stretch rate. Forcing it on produces only two outcomes: wrinkling or hollowing. Some people use the cut-and-tile method to force it, cutting slit after slit, and the result looks like a paper-mache ball—the continuity of the stone is completely lost. I generally advise the client to change the design.
An excessively small radius is also a dead end. Below R200, even if the board bends at the time, internal stress remains, and after bonding the edges and corners keep springing back, lifting before the adhesive has even cured. Forcing it down only leads to adhesive fatigue after three months, with the same result. For such locations, switching to metal panels or GRC is actually simpler.
Sharp exposed corners need separate mention. For exposed corners of less than 60 degrees, wrapping a whole panel around the outside creates too much strain, and the corner will definitely whiten. A feasible approach is to cut two panels at 45 degrees and join them, leaving the seam at the corner and applying weather-resistant sealant in the same color; alternatively, use metal corner guards directly. The former is more labor-intensive, while the latter changes the appearance; choose according to the project positioning.
There is another kind of "can't be done" that is fake. The client says this curve is too large to do, when in fact the substrate was not done right. Eighty percent of the difficulty of curved walls lies in the substrate, and twenty percent in the panels. Once the curve of the substrate is made smooth, curved walls above R1500 are not difficult to clad with standard panels.
View alongside aluminum veneer panels and GRC
Aluminum veneer allows the widest range of forms. Both single-curved and double-curved shapes can be made, by roll bending or mold opening, with fluorocarbon coating on the surface for stable color; joints are open joints sealed with sealant, giving a strong industrial feel. The cost is a high unit price, which is usually the main cost driver for an entire curved aluminum panel section; it also requires a supporting frame, with panel thickness of 2.5 to 3 mm, and it sounds metallic when tapped. For form-driven areas, it is the first choice.
GRC is glass-fiber-reinforced cement, which can produce highly complex shapes, with a thickness of 15 to 25 mm and a large single-piece area. The problem is that it is heavy, several tens of kilograms per square meter, and must be supported by a steel frame; there are many joints, the seams are sealed with adhesive, and over time the adhesive seams turn black; the production cycle is long, and changing a mold once costs money. It is suitable for large shapes and sculptural areas.
The position of flexible stone is very clear: single curved surfaces, light weight, low cost, fast construction, and a texture close to stone. With a self-weight of 3 to 5 kg, its requirements for the substrate are much lower than those of stone, which is especially evident in renovation projects.Slate SeriesFor panels with deep textures like this, a larger radius must be left when bending, but the curved-surface texture achieved is something coatings and aluminum panels cannot provide.

Give one judgment: if the shape complexity goes beyond a single curved surface, don't spend time on flexible stone—go directly to aluminum panels or GRC. Conversely, if it is a large-radius curved wall, a row of columns, or a barrel vault, flexible stone is the most trouble-free route, provided the substrate is built solidly as described above.
One last point. The success or failure of curved areas cannot be seen at acceptance; it only becomes apparent three years later. Hollowing, edge lifting, and seam cracking are all debts left by how the substrate and rebound were handled at the time. For curved surfaces, go slower—it is worth it.



 WhatsApp

 Guangdong Public Network Security Preparation No. 44200002005257
